Physical Address
304 North Cardinal St.
Dorchester Center, MA 02124
Physical Address
304 North Cardinal St.
Dorchester Center, MA 02124
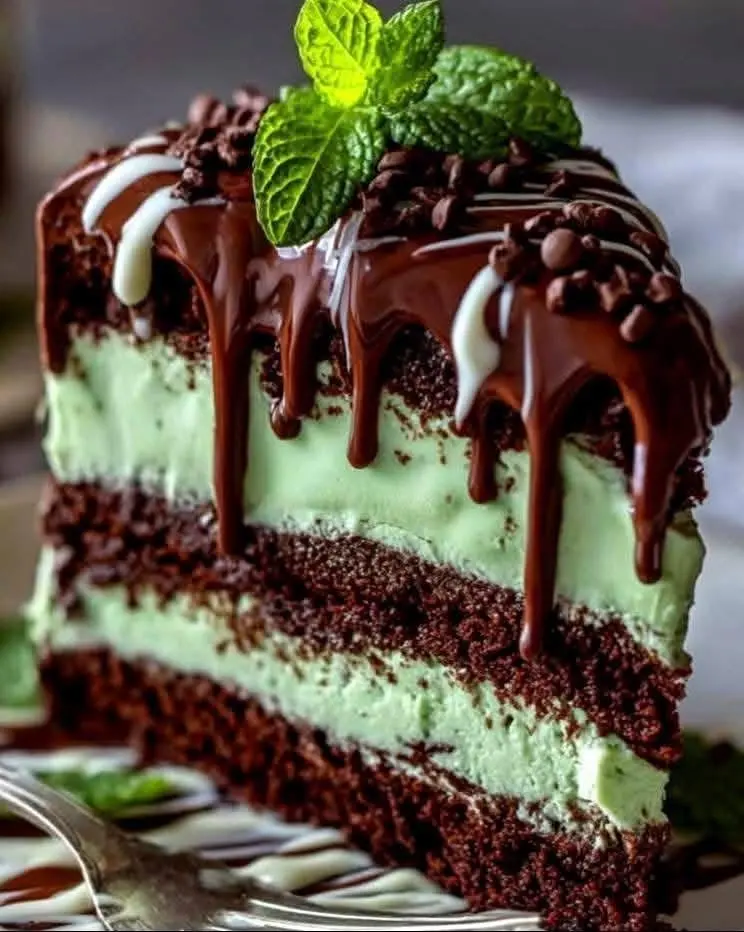
Some flavor combinations are fashionable. Others are permanent. Mint and dark chocolate falls firmly into the second category — and this Mint Chocolate Chip Layer Cake is proof of exactly why that pairing has never needed to reinvent itself.
Picture it: three layers of deeply moist chocolate sponge, each one separated by thick, cool mint cream frosting the color of fresh spring leaves. The outside is pressed with chocolate cake crumbs. The top is draped in a glossy dark ganache drip, laced with white chocolate ribbons, scattered with mini chocolate chips, and crowned with a sprig of real mint. It is the kind of cake that causes phones to come out at the table before forks do.
This guide gives you everything — the full recipe, the techniques behind each step, the tips that prevent the mistakes most people make the first time, and clear answers to the questions that usually come up halfway through baking. Your Mint Chocolate Chip Layer Cake starts right here.
Before diving into the recipe, it is worth understanding why this flavor combination has such lasting power — because once you understand it, you will use it more confidently in the kitchen.
Mint contains menthol, a compound that activates the same cold-sensing receptors on your tongue as actual cold temperatures. This is why mint desserts feel refreshing even when they are rich. Paired with the roasted bitterness of dark chocolate, mint creates a push-pull effect that keeps every bite interesting. Neither flavor overwhelms the other. They correct each other — and that is what makes the combination so satisfying across so many different dessert formats.
In a layer cake, that dynamic plays out beautifully across the structure:
This recipe has four components. Set everything out by group before you start — it keeps the workflow clean and prevents the kind of mid-bake scrambling that leads to mistakes.
| Ingredient | Amount | Notes |
|---|---|---|
| All-purpose flour, sifted | 2 cups / 250g | |
| Granulated sugar | 2 cups / 400g | |
| Dutch-process cocoa powder | ¾ cup / 75g | Unsweetened |
| Baking soda + baking powder | 2 tsp + 1 tsp | |
| Fine sea salt | 1 tsp | |
| Eggs (room temperature) | 2 large | |
| Buttermilk | 1 cup / 240ml | Room temperature |
| Strong brewed coffee | 1 cup / 240ml | Deepens chocolate flavor |
| Vegetable oil | ½ cup / 120ml | |
| Pure vanilla extract | 2 tsp |
| Ingredient | Amount | Notes |
|---|---|---|
| Unsalted butter (softened) | 1½ cups / 340g | Must be room temperature |
| Cream cheese (softened) | 115g / 4 oz | Full fat only |
| Powdered sugar, sifted | 4 cups / 480g | |
| Heavy cream | 3–4 tbsp | Adjust for consistency |
| Peppermint extract | 1–1½ tsp | Start at 1 tsp; taste first |
| Gel green food coloring | 4–5 drops | Gel only — not liquid |
| Ingredient | Amount | Notes |
|---|---|---|
| Dark chocolate (70%), chopped | 200g / 7 oz | |
| Heavy cream | ½ cup / 120ml | |
| Unsalted butter | 1 tbsp | For gloss |
| White chocolate (for drizzle) | 80g / 3 oz | Melted separately |
🌿 Peppermint extract warning: It is far more potent than it smells. Start with exactly 1 teaspoon, taste your frosting before adding more, and know that the flavor strengthens after the cake chills overnight. One drop too many is the most common mistake with this recipe — and it is not fixable once the frosting is spread.
Preheat your oven to 350°F / 175°C. Grease three 9-inch round cake pans, line the bases with parchment circles, and grease the parchment. This two-step preparation guarantees every layer releases cleanly.
Sift all dry ingredients into a large bowl and whisk together. In a separate jug, combine eggs, buttermilk, coffee, oil, and vanilla. Pour wet into dry and mix on medium speed for 2 minutes. The batter will look thin — that is exactly right. Thin batter produces the moist, tender crumb that makes this cake work.
Divide evenly between the pans and bake for 28–33 minutes. Pull the layers when a toothpick shows moist crumbs but no wet batter — they continue baking in the pan as they cool. Overbaking is the primary cause of dry chocolate cake, and the fix is simply pulling them out slightly earlier than feels comfortable.
Cool in pans for 15 minutes, then transfer to wire racks. Refrigerate for 30 minutes before assembly — cold layers stack and frost far more cleanly than room-temperature ones.
Both your butter and cream cheese must be fully at room temperature before you start — at least one hour out of the fridge. Cold butter produces lumpy, grainy frosting that cannot be rescued by extra mixing.
Beat butter alone on medium-high for 4 to 5 minutes until pale and visibly fluffy. Add cream cheese and beat for 2 more minutes. Add sifted powdered sugar in three additions, mixing on low after each to avoid a cloud of sugar. Add peppermint extract, gel coloring, and a pinch of salt. Taste. Adjust if needed. Add heavy cream one tablespoon at a time until the frosting is smooth and spreadable but holds its shape when you pull the spatula away.
Use a long serrated knife to level any dome from each cake layer. Save every single crumb — they become the crumb coating on the outside. Place your first layer on a cake board on a turntable. Spread ½ to ¾ cup of mint frosting evenly across the surface. Stack the second layer, repeat, then place the third layer on top and press gently to level the stack.
Apply a thin layer of mint frosting over the entire outside of the assembled cake — this is your crumb coat. It does not need to look perfect. Its job is to seal every loose chocolate crumb so your final layer goes on cleanly. Refrigerate for 30 minutes until completely firm, then apply your final frosting layer using an offset spatula and bench scraper. Chill for another 30 minutes.
Press your reserved chocolate cake crumbs firmly onto the chilled frosted sides — the cold frosting holds them in place immediately, creating that rustic textured exterior that defines the look of this cake.
Pour near-simmering cream over chopped dark chocolate. Wait 2 minutes, then stir from the center outward. Add butter and stir until completely smooth and glossy. Cool for 12–15 minutes until the ganache coats a spoon thickly and drips from it slowly before you use it — this thickness is what gives you those controlled, photogenic drips rather than a puddle that runs to the plate.
Pour ganache over the center of the cold cake and guide it gently toward the edges. Let it find its own drip lines — forced drips never look as natural as gravity-led ones. While still slightly soft, drizzle melted white chocolate in thin back-and-forth lines across the top. Scatter mini chocolate chips, press in your mint sprigs, and refrigerate for a final 20 minutes before slicing.
🔪 Clean slice every time: Dip a long sharp knife in hot water, wipe completely dry, press straight down — do not saw. The cold frosting and ganache cut cleanly without dragging. Hot water dip, dry wipe, repeat between every slice.
Your Mint Chocolate Chip Layer Cake keeps beautifully. In the refrigerator, covered loosely, it stays excellent for up to 5 days — the chocolate sponge actually improves in moisture over the first 48 hours. Allow slices 15–20 minutes at room temperature before eating for the best texture.
For make-ahead preparation: bake and refrigerate layers up to 3 days before. Make frosting up to 2 days before. Assemble and frost the day before. Apply ganache and fresh mint on the day you serve it.
Almost always caused by butter that was too warm when beaten — slightly melted butter produces frosting that spreads but will not hold its shape. Refrigerate the frosting for 20 minutes and re-beat. If it is still too soft, add sifted powdered sugar one tablespoon at a time until it firms to the right consistency.
Yes — divide the batter between two 9-inch pans and increase baking time to 33–38 minutes. The result is slightly less dramatic in cross-section but equally delicious. Reduce the frosting quantities by about 25%.
Two things: a cold cake and ganache at the right temperature. The ganache needs to be thick enough to cling and drip slowly — if it pours like water it is too warm. Cool it longer. Pour slowly from the center. Do not force the drips with a spatula — let gravity do the work.
Yes. The cake tastes identical without it — your frosting will be a pale cream color instead of green. For a natural alternative, ½ teaspoon of spirulina powder produces a soft sage green with minimal flavor impact.
A Mint Chocolate Chip Layer Cake this beautiful and this deeply flavored does not happen by accident. It happens because every component was built with intention — the coffee in the batter, the gel coloring in the frosting, the crumb coat that makes the final layer smooth, the cold cake that makes the ganache drip perfectly.
You now have the recipe, the technique, the tips, and the fixes for everything that could go wrong. The only step left is to bake it.
📌 Try this recipe and share your results. Drop a comment below — tell us how your ganache drip looked, which variation you tried, or what happened when you set it on the table. Tag a friend who deserves a slice, and help someone else find the confidence to bake something genuinely spectacular. 🍫🌿