Physical Address
304 North Cardinal St.
Dorchester Center, MA 02124
Physical Address
304 North Cardinal St.
Dorchester Center, MA 02124
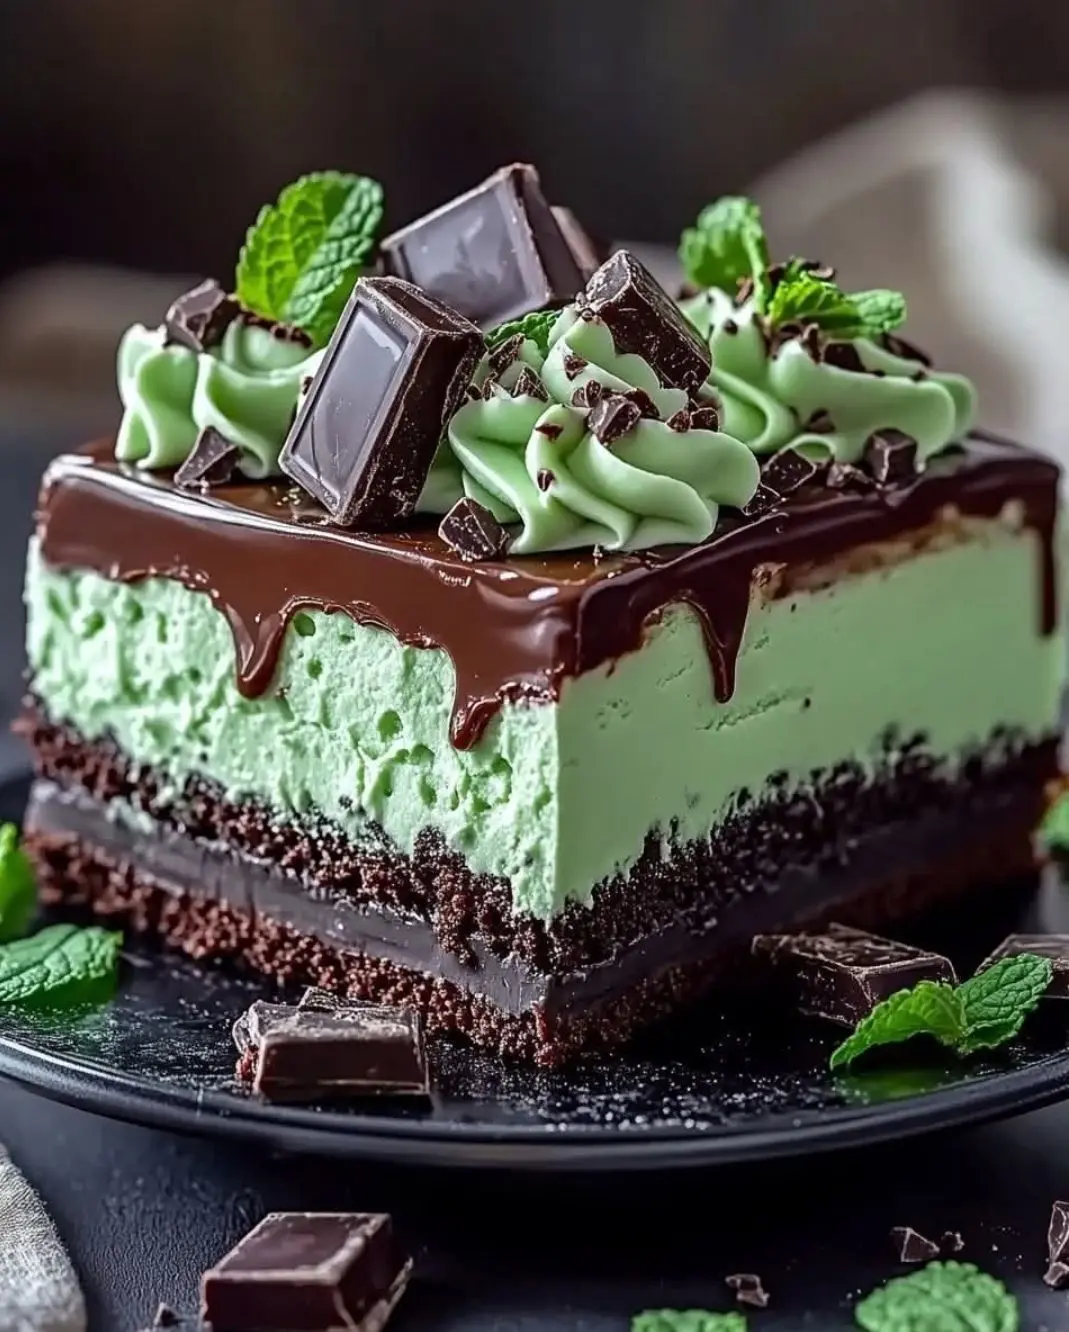
Some desserts are made to fill a plate. Others are made to fill a room with conversation. The moment you set a Mint Chocolate Mousse Cake on any table — that vivid green mousse contrasting against glossy dark chocolate ganache, topped with piped cream rosettes and fresh mint leaves — you will understand immediately which category this falls into.
This is the cake that people photograph before they eat it. The one that gets requested again by name. The kind of dessert that quietly convinces people you are a far more skilled baker than you might feel.
And here is the truth: it is more achievable than it looks. With the right steps, the right temperatures, and a bit of patience in the chilling stages, your Mint Chocolate Mousse Cake will come out exactly the way it looks in the image — dramatic, layered, and deeply satisfying in every bite.
Mint and dark chocolate have been paired in desserts for over a century — and there is a clear reason that combination has never faded. The sharp, cool freshness of peppermint does something that very few flavors can: it cuts cleanly through richness without competing with it. Dark chocolate, with its roasted bitterness and depth, provides exactly the kind of foundation that mint needs to shine.
When you build that pairing into a layered mousse cake, you get something genuinely more than the sum of its parts:
Every component earns its place. Nothing here is decoration for decoration’s sake.
Before you begin, organize your ingredients into the four components that make up this cake. It takes a few extra minutes upfront and saves considerably more time once you are actually at the stove.
| Ingredient | Amount |
|---|---|
| Dark chocolate (70%), chopped | 200g / 7 oz |
| Unsalted butter | ½ cup / 115g |
| Granulated sugar | 1 cup / 200g |
| Eggs (room temperature) | 3 large |
| All-purpose flour, sifted | ½ cup / 65g |
| Cocoa powder (Dutch-process) | ¼ cup / 25g |
| Salt + vanilla extract | ½ tsp + 1 tsp |
| Ingredient | Amount |
|---|---|
| Heavy whipping cream (very cold) | 2 cups / 480ml |
| White chocolate, melted and cooled | 100g / 3.5 oz |
| Powdered sugar | ¼ cup / 30g |
| Peppermint extract | 1 – 1½ tsp |
| Gel green food coloring | 3–4 drops |
| Gelatin powder + cold water | 2 tsp + 3 tbsp |
| Ingredient | Amount |
|---|---|
| Dark chocolate (70%), finely chopped | 180g / 6 oz |
| Heavy cream | ⅓ cup / 80ml |
| Unsalted butter + corn syrup | 1 tbsp + 1 tsp |
🌿 Extract warning: Peppermint extract is far stronger than it smells. Start with 1 teaspoon, taste before the mousse sets, and add more only in single drops. The flavor also intensifies overnight in the fridge — what tastes mild before chilling often tastes much bolder the next morning.
Heat your oven to 325°F / 160°C. Line a 9-inch springform pan with parchment and lightly grease the sides.
Melt chocolate and butter together until smooth, then cool slightly. Whisk in sugar, then eggs one at a time. Stir in vanilla. Fold in sifted flour, cocoa, and salt — stop mixing the moment the batter comes together. Overmixing builds gluten and takes away that dense, fudgy quality you want in the base.
Bake for 22–26 minutes. Pull it out when the center still looks just set — it finishes cooking as it cools. Refrigerate for at least one full hour before building the mousse on top.

Sprinkle gelatin over cold water and leave it completely undisturbed for 5 minutes to bloom properly. Melt white chocolate and set it aside to cool until barely warm — not hot, not cold. Microwave the bloomed gelatin for 10 seconds and stir it into the cooled white chocolate until fully combined.
In a chilled bowl, whip your cold heavy cream with powdered sugar, peppermint extract, and green gel coloring to soft peaks only. Over-whipping here leads to a grainy mousse that never quite recovers. Fold the white chocolate mixture into the cream in three slow, deliberate additions. Refrigerate for 15 minutes to thicken slightly before pouring.
Keep the brownie in the springform pan and line the inner sides with an acetate strip or tall parchment collar. Pour the mint mousse directly over the cooled brownie. Spread level with an offset spatula, then tap the pan on the counter two or three times to settle any trapped air.
Cover and refrigerate for a minimum of 5 hours. Overnight is better — the layers become cleaner, the mousse sets more firmly, and every slice will show those defined layers clearly.
Pour near-simmering cream over chopped chocolate. Wait two minutes, then stir from the center outward. Add butter and corn syrup; stir until completely glossy. Rest at room temperature for 15–20 minutes until the ganache is thick but still pourable — it should coat the back of a spoon heavily before you use it.
Release the cake from the pan and peel away the acetate collar. Set on a wire rack over a tray. Pour ganache from the center and let it drip naturally over the sides without forcing it. While it is still slightly soft, press dark chocolate chunks across the top surface.
Whip a cup of cold cream with powdered sugar, a few drops of peppermint extract, and 2 drops of green gel to stiff peaks. Load into a piping bag with a star tip and pipe rosettes across the top. Tuck fresh mint leaves between each rosette. Chill for a final 20–30 minutes before you slice and serve.
🔪 For clean slices: Dip your knife in hot water, wipe it fully dry, and cut in one smooth downward stroke. Repeat between every single slice — it takes an extra 10 seconds and makes an enormous difference to how each portion looks on the plate.
This cake is an ideal make-ahead dessert. The brownie base can be baked 2 days in advance, wrapped and refrigerated. The assembled cake — mousse set, before ganache — can be done the night before. Apply the ganache and decorate on the day of serving, adding fresh mint leaves at the very last moment.
Leftovers keep well in the fridge for up to 4 days. Individual slices can be frozen for up to 8 weeks — wrap in plastic wrap then foil, and thaw overnight in the refrigerator rather than at room temperature.
Yes — substitute with agar-agar powder in the same quantity. The mousse sets slightly firmer with agar, but the flavor and visual result are both excellent. This also makes the recipe vegetarian-friendly.
The two most common causes are cream that was not cold enough when whipped, or chocolate that was still warm when it hit the cream and partially melted it. Always cool your melted chocolate until it is barely warm before folding it in.
A 9-inch Mint Chocolate Mousse Cake serves 12–14 people at standard slice portions. Because the brownie base is dense and filling, smaller slices tend to satisfy fully — which means the cake stretches further than most.
You can, but reduce the powdered sugar in the mousse by half to compensate for the extra sweetness. The ganache will also lose some of its dramatic contrast against the green mousse — the dark version creates a much bolder visual effect.
There is a specific kind of satisfaction that comes from pulling a layered cake out of the fridge, peeling back the collar, and watching it hold together exactly as planned — every layer clean, every edge smooth, the ganache gleaming. This Mint Chocolate Mousse Cake delivers that feeling reliably, provided you respect the temperatures and give each stage the time it needs.
You have the full recipe, the tips that prevent the most common mistakes, and the troubleshooting knowledge to course-correct if anything goes sideways. Everything you need is already here.