Watch the step-by-step cooking video at the bottom of the recipe!👇
Some desserts are made to be eaten. Others are made to be remembered. This Chocolate Strawberry Mousse Cake is firmly in the second category — and the best part? You can make it yourself, right in your own kitchen.
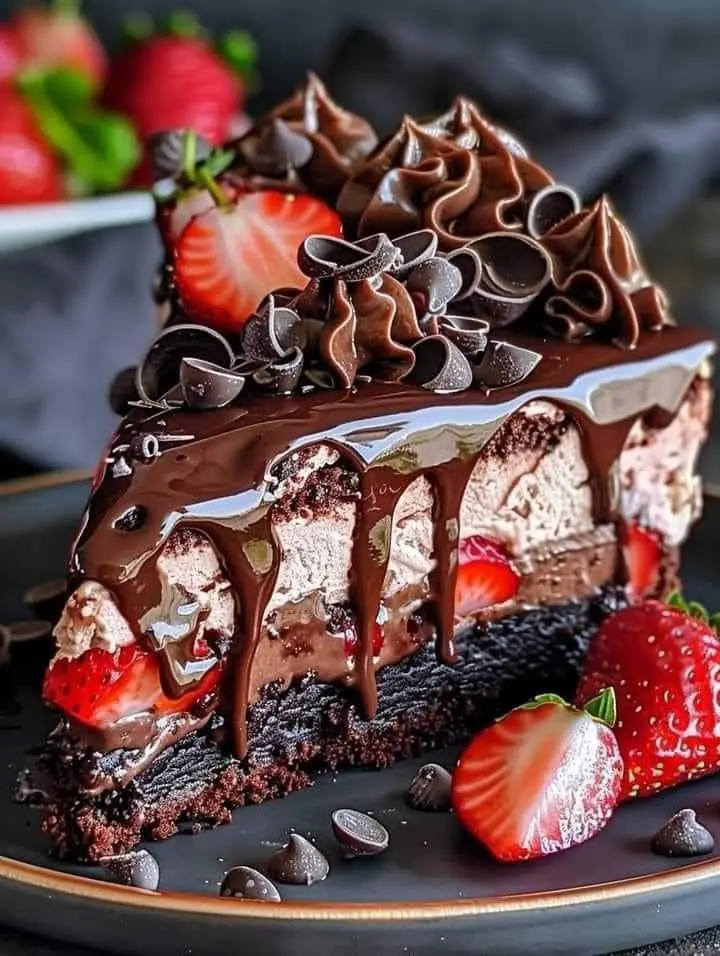
The moment you set this on a table, something shifts. Conversation stops. Phones come out. And then — after that first bite — the room fills with the kind of silence that only great food produces. A brownie-dense chocolate base, a cloud of chocolate mousse hiding fresh strawberry pieces, a glossy ganache drip cascading down the sides, and a crown of chocolate rosettes and curls on top. It is dramatic. It is indulgent. And it is completely achievable.
Whether you are baking for a birthday, a celebration dinner, or simply because the week has been long and you deserve something extraordinary — this Chocolate Strawberry Mousse Cake recipe is built for you.
What Makes This Chocolate Strawberry Mousse Cake So Special?
There are chocolate cakes, and then there is this. What separates a good cake from an unforgettable one usually comes down to layers — not just of sponge, but of texture, flavor, and contrast.
The brownie base gives you density and a deep, roasted chocolate flavor that a standard sponge simply cannot match
The chocolate mousse filling is light enough to feel effortless, yet rich enough to satisfy completely
Fresh strawberries folded inside the mousse add bursts of juicy acidity that cut through the richness at just the right moment
The ganache drip finishes the cake with a glossy, professional look that requires very little technique
Chocolate and strawberry is a pairing that has stood the test of time — and for good reason. The natural sweetness and slight tartness of ripe strawberries balance the bitterness of dark chocolate perfectly. Every forkful delivers both at once.
Ingredients You Will Need
Set everything out before you begin. This recipe has three distinct components, and having your ingredients measured and ready makes the whole process feel far less daunting.
🍫 Fudgy Chocolate Brownie Base
Ingredient
Amount
Dark chocolate (70% cocoa), melted
200g / 7 oz
Unsalted butter
½ cup / 115g
Granulated sugar
1 cup / 200g
Eggs
3 large
All-purpose flour
½ cup / 65g
Unsweetened cocoa powder
¼ cup / 25g
Salt
½ tsp
Vanilla extract
1 tsp
🍓 Chocolate Strawberry Mousse
Ingredient
Amount
Dark chocolate (60%), melted and cooled
180g / 6 oz
Heavy whipping cream (very cold)
2 cups / 480ml
Powdered sugar
3 tbsp
Gelatin powder + cold water
1½ tsp + 2 tbsp
Fresh strawberries, sliced
250g / 9 oz
Vanilla extract
1 tsp
🍫 Dark Chocolate Ganache Drip
Ingredient
Amount
Dark chocolate (70%), finely chopped
150g / 5 oz
Heavy cream
⅓ cup / 80ml
Unsalted butter
1 tbsp
🍓 Decoration
Fresh whole and halved strawberries
Chocolate curls and shavings
Chocolate whipped cream (for piped rosettes)
Mini chocolate chips (optional, for plating)
Baker’s Note: Your strawberries carry a lot of flavor weight in this recipe. Use the ripest, most fragrant ones you can find. If they smell incredible raw, they will taste even better inside the mousse.
How to Make Chocolate Strawberry Mousse Cake: Step-by-Step
Step 1: Bake the Brownie Base
Preheat your oven to 325°F (160°C). Line the base of a 9-inch springform pan with parchment paper and lightly grease the sides.
Melt butter and chopped chocolate together in a heatproof bowl over simmering water, stirring until smooth. Remove from heat and let cool slightly.
Whisk in sugar, then add eggs one at a time, beating well after each addition. Stir in vanilla.
Fold in flour, cocoa powder, and salt until just combined — do not overmix or you lose that fudgy texture.
Pour into your prepared pan and bake for 22–26 minutes. The center should look just set, not fully dry. It will firm up as it cools.
Cool completely in the pan. Do not rush this — a warm brownie base will melt your mousse layer.
Bloom gelatin: sprinkle gelatin powder over cold water and let it sit undisturbed for 5 minutes.
Melt the chocolate until smooth. Let it cool to room temperature — it should feel barely warm to the touch before using.
Warm the bloomed gelatin gently in the microwave for 10 seconds and stir into the cooled chocolate until fully combined.
Whip cold heavy cream with powdered sugar and vanilla to soft peaks. Do not overwhip — you want volume, not stiffness.
Fold the chocolate mixture into the whipped cream in three additions, using a wide spatula with slow, deliberate strokes to preserve the airiness.
Gently fold in the sliced fresh strawberries last.
Step 3: Assemble the Cake
Keep the cooled brownie base inside the springform pan. Line the inner sides with a strip of acetate or parchment.
Pour the chocolate strawberry mousse over the brownie base and spread level with an offset spatula.
Tap the pan gently on the counter two or three times to release any air pockets.
Cover and refrigerate for a minimum of 5 hours. Overnight is strongly recommended for the cleanest release and firmest layers.
Step 4: Make the Ganache and Finish
Heat cream until it just begins to simmer. Pour over finely chopped chocolate, wait two minutes, then stir from the center outward until completely smooth.
Stir in butter for extra shine. Allow to cool until the ganache is thick but still pourable — around 15 minutes at room temperature.
Release the cake from the springform pan and peel away the acetate. Set on a wire rack over a tray.
Pour ganache over the center and encourage it to drip naturally down the sides — do not force it.
Pipe chocolate whipped cream rosettes around the top edge. Arrange fresh strawberry halves and chocolate curls across the surface.
Chill for a final 20–30 minutes before slicing and serving.
Clean slice tip: Run your knife under hot water, dry it fully, then cut. Repeat between every slice for bakery-clean edges every time.
Expert Tips for the Best Results
Cold cream, always. Warm cream will not whip properly. Your bowl and beaters can go in the freezer for 10 minutes before you start — it makes a real difference.
Cool chocolate before folding. If it is too warm when it hits the whipped cream, it will seize or deflate the mousse. Aim for just barely warm to the touch.
Acetate collar = clean sides. This inexpensive tool gives your mousse perfectly smooth, vertical edges when you release the pan. Parchment works too.
Overnight chill is worth it. Five hours sets the mousse; overnight transforms it into something you can slice cleanly and photograph beautifully.
Pat strawberries dry before folding into the mousse. Excess moisture weakens the structure of the filling over time.
White chocolate mousse layer — replace the dark chocolate mousse with white chocolate mousse for a sweeter, creamier contrast
Strawberry compote layer — spread a thin layer of homemade strawberry jam between the brownie and mousse for a more intense fruit hit
Oreo brownie base — press a layer of crushed Oreos mixed with melted butter as the base instead of a baked brownie
Mixed berry version — combine strawberries with raspberries or sliced cherries inside the mousse
Individual mini cakes — use small springform molds for personal-sized portions; ideal for elegant plated desserts
How to Store Chocolate Strawberry Mousse Cake
Refrigerator
Keep the cake covered in the fridge for up to 4 days. The mousse stays firm and the brownie base stays fudgy. Best consumed within the first two days for peak texture and fresh strawberry flavor.
Freezer
Freeze without the fresh strawberry garnish on top
Wrap individual slices in plastic wrap, then foil
Freeze for up to 6 weeks
Thaw overnight in the fridge — never at room temperature
Add fresh garnish after thawing
Make-Ahead Plan
2 days before: Bake and cool the brownie base
1 day before: Make mousse, assemble, and refrigerate overnight
Day of serving: Apply ganache, decorate, and serve
Frequently Asked Questions About Chocolate Strawberry Mousse Cake
Can I make Chocolate Strawberry Mousse Cake without gelatin?
Yes. Use agar-agar powder as a direct substitute in the same quantity. The mousse will set slightly firmer, but the flavor remains excellent. This also makes the recipe suitable for vegetarians and vegans when paired with coconut cream instead of heavy cream.
For this particular Chocolate Strawberry Mousse Cake, yes — a springform pan is strongly recommended. The mousse layer needs to be set vertically, and releasing it cleanly is only possible with a pan that opens at the sides. A regular cake pan will make removal very difficult without damaging the layers.
Can I use milk chocolate instead of dark chocolate?
You can, but the result will be noticeably sweeter and less complex in flavor. If you prefer milk chocolate, reduce the powdered sugar in the mousse by half to compensate. For the ganache, milk chocolate also produces a lighter drip — which can look beautiful, just different from the dramatic dark finish shown here.
Why did my mousse turn out dense instead of airy?
The two most common causes are overwhipped cream (taken past soft peaks to stiff peaks before folding) or chocolate that was still too warm when it met the cream and partially cooked it. Both result in a heavier, denser texture. The fix: whip to soft peaks only, and always let melted chocolate cool until barely warm before incorporating.
How many people does this Chocolate Strawberry Mousse Cake serve?
A 9-inch cake serves 12–14 people at normal slice portions. If serving as part of a multi-course dessert table, it can stretch to 16 slices. The brownie base makes each slice satisfying and filling, so smaller portions often work well.
Can I make this cake gluten-free?
Yes. Replace the all-purpose flour in the brownie base with a 1:1 gluten-free flour blend. The mousse and ganache are naturally gluten-free. Double-check that your chocolate brands are certified gluten-free, as cross-contamination can occur in manufacturing.
This Is Your Sign to Make It This Weekend
There are recipes you bookmark and forget. And then there are recipes that quietly shift the way you think about what you are capable of making at home. This Chocolate Strawberry Mousse Cake is the second kind.
Yes, it takes a full afternoon. Yes, the overnight chill requires patience. But when you carry that finished cake to a table — ganache gleaming, strawberries stacked on top, chocolate curls catching the light — and you watch the reaction of everyone around you, every minute of effort makes complete sense.
You do not need professional training. You do not need a fancy kitchen. You need good ingredients, the right steps, and the willingness to give yourself enough time to do it properly. Everything else is already here.